Wednesday, January 4, 2012

My Mary Laslie - free pattern

My niece wore an Easter dress with a beautiful smocked yoke and I needed to come up with a sweater design that would not cover up all of that wonderful needle work.  This is the result and it worked perfectly.

This is worked from the top down and is a 2T:

Materials: US 7 circulars (at least 32 inches long) and dpns, US 5 circulars and dpns. Two skeins and ½ of I Love This Cotton, or about 450 yards of Worsted weight. You will also need stitch markers and a darning needle.
Terms:
WS - wrong side
RS- right side
pm- place marker
m1r - make one right
m1l- make one left
kfb- knit in front and back

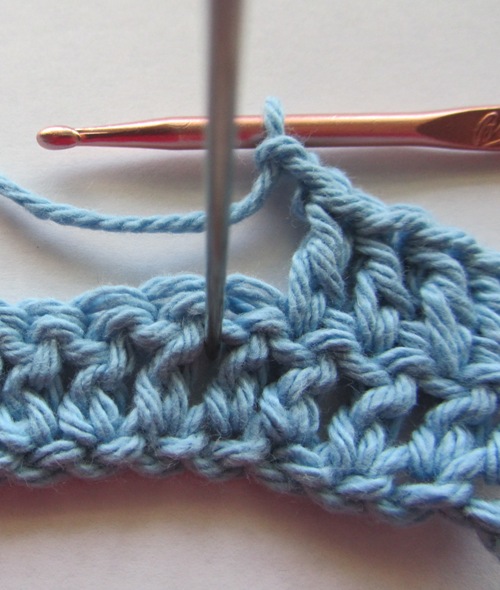
You will be have to "pick up and knit" twice and I find that crochet hook makes this much easier.

CO 44 sts

Row 1: (WS) p3 (front), pm, p6(sleeve) , pm, p26(back), pm, p6(sleeve), pm, p3(front)

Row 2: (RS) K1, m1r,( knit to one stitch before marker, kfb, slip maker, kfb)across to last st, m1l, k1 (increase of 10 sts)

Row 3: purl

Row 4: K1, m1r,( knit to one stitch before marker, kfb, slip maker, kfb)across to last st, m1l, k1 (increase of 10 sts)

Row 5: purl

Row 6: K1 K1, m1r,( knit to one stitch before marker, kfb, slip maker, kfb)across to last st, m1l, k1 (increase of 10 sts)

Row 7: purl

Row 8: K1 K1, m1r,( knit to one stitch before marker, kfb, slip maker, kfb)across to last st, m1l, k1 (increase of 10 sts)

Row 9: purl

Row 10: K1, m1r,( knit to one stitch before marker, kfb, slip maker, kfb)across to last st, m1l, k1 (increase of 10 sts)

Row 11: purl

Row 12: K1, m1r,( knit to one stitch before marker, kfb, slip maker, kfb)across to last st, m1l, k1 (increase of 10 sts)

Row 13: purl

Row 14: K1, m1r,( knit to one stitch before marker, kfb, slip maker, kfb)across to last st, m1l, k1 (increase of 10 sts)

Row 15: purl

Row 16: K to one st before marker, kfb, slip marker, kfb, knit to end

Row 17: purl

Row 18: K to one st before marker, kfb, slip marker, kfb, knit to end

Row 19: purl

Row 20: K to one st before marker, kfb, slip marker, kfb, knit to end

Row 21: purl

Row 22: K to one st before marker, kfb, slip marker, kfb, knit to end

Row 23: purl

Row 24: K to one st before marker, kfb, slip marker, kfb, knit to end

Row 25: purl

Row 26: K to one st before marker, kfb, slip marker, kfb, knit to end

Row 27: purl

Row 28: K to one st before marker, kfb, slip marker, kfb, knit to end

Row 29: purl

Row 30: K to one st before marker, kfb, slip marker, kfb, knit to end

Row 31: purl

Row 32: knit to marker and remove it, put the next 36 sts (sleeve) on scrap yarn to be worked later, remove marker, CO 8 sts, knit across the back sts to the next marker, remove it and place the next 36 sts on scrap yarn, remove next marker, CO 8 and knit to end.

You will now work the remaining sts (front, underarm, back, underarm, front) until the it measures 5.5 inches when measured on the back from the cast on edge down, end with a wrong side row.

(This is the Band)
 Using your smaller circular needle knit 5 rows of seed stitch and bind off.

*This is where I like to use a crochet hook to help pick up sts.*

Turn the piece so that it is RS down with the cast off edge closest to you. With your larger needles, you will need to pick up and knit 175 sts across the seed stitch "band" that you just made.
Do not pick up stitches in the cast off loops; use the bumps from the 4th and 5th rows of seed stitch. The bottom of this sweater is going to weigh much more than the top, picking up sts from those two rows added some stability to the piece.

Continue in stockinet stitch until the sweater measures 12 inches from the center of the cast on stitches down the back.

Switch to smaller needles and work 5 rows of seed st, BO.

Sleeves:

Using dpns

Move all of your stitches from your waste yarn to a single dpn.

Row 1: starting at the center of the underarm, in the stitches you cast on, pick up and knit 5 sts, then knit 10 sts from your dpn (the stitches you moved from the yarn), on a second needle knit 16 more stitches from the needle, on a 3rd knit the remaining 10 sts and then pick up and knit 5 more from the cast on area under the arm.


*I know that you only cast on 8, but I have found that if I don’t pick up and extra st on each side I end up with a hole…*

Row 2: knit

Row 3: k2tog, knit to last two sts and k2tog.

Continue knitting around until the sleeve measures 9 inches from the neck.

Switch to smaller needles and knit 5 rows of seed stitch and bind off.

Edging:

With smaller needles:

Starting at bottom right side, with right side facing you, pick up and knit evenly up the right front, around the neck, and then down the left side.

Row 1: seed st

Row 2: seed st

Row 3: continue in seed st until you get to the area that intersects with the band, bind off two stitches, knit to other side and repeat at the corresponding area. (making the "holes" to tie the ribbon through)

Row 4: Work in seed stitch, casting on two new stitches on both sides where you cast them off last round.

Row 5: Cast off.


Add As You Go Flowers...

Originally "Add On Flower Border"

Sick of finishing the main project and weaving in ends, then creating each flower and weaving in their ends, then attaching them to your project and then weaving in those ends...me too.
I came up with a way to add the flowers as you go!  They can be placed randomly all over a project or in a row to form a nice border.  The best part is how easy it is to do!

*For this example I am going to assume that the last row and current row are dc  (double crochet)-adjust as necessary for hdc and sc*

When you are ready to place a flower instead of making a dc in the next stitch you will ch 2 and ss to the top of the space.

 Not here:


Here:

Put two sc in this spot and turn your work clockwise so that the dc post (that is directly to the left of the metal pointer in the above photo) becomes the top of your work, put three sc here. 
Turn clockwise again so that the bottom of your work is now the top and work two sc, turn clockwise again and place three sc  (the post of the dc that was to the right of the metal pointer), join with a ss to the first sc.
This gives you a "base" or ring to build your flower.  At this point you can *ch2, 3 dc, ch2 and ss in next sc* around for a basic flower. This base should accommodate most flower designs.

When finished join with a ss. 

At this point you need to work your way behind the flower by ss in the back of the first two sc that formed the base of your flower.  This puts you in a position to continue the pattern before you interrupted it with the flower.  In our dc example you would need to ch 2 and continue your dc into the next stitch.
****NOTE : you started the flower by ch 2 and ss and to rejoin your progress you ch 2- so you will have an extra stitch- on the next row - dc those two chains together.

Really easier than I made it sound ;)

Wednesday, December 7, 2011

Felted Clogs...

These slippers were knitted using the Big Snuglet pattern. I needle felted the lotus flower design on "free hand".  I discovered that when you do something like this trying to get the designs to match perfectly is absolutely insane.

Advent Calendar

I came up with this pattern a few years ago for my Mom's birthday.  Because this pattern is so portable it works up in no time! You can use any worsted weight yarn for this project…a perfect way to use up your ends.

I kept an F hook and a little worsted in my purse and thanks to the inordinately long wait at our Urgent Care center, public school and the Flu I was able to knock my calendar out in no time.

Hat Tip To Christmas Vacation...

Monday, December 5, 2011

Christmas Top...

Love the monogram!  This is the shorter version of the Double Ruffle Knot Dress...


Wednesday, October 12, 2011

The Pillowcase Dress

The Pattern/Tutorial trend is a wonderful thing because it  is not just a set of measurements and pattern pieces.  In most cases they provide extremely detailed step-by-step instructions - WITH PICTURES!

One rainy day I found The Betsy Dress  on Etsy and within hours I was whipping out my own dresses! 

     
Master the basic dress and then you can do just about anything....


I found this great applique design at Trendy Stitches , added a ruffle and people are just going crazy for this dress. 

With a long sleeved T-shirt and a pair of leggings and these little dresses can be worn all year.  Add a few inches to the length and it's a nightgown...the possibilities are limitless.

Tuesday, October 11, 2011

Double Ruffle Knot Dress

LOVE this pattern from Little Lizard King!  The only downside is that I can't "French Seam" my way through it...going to have to learn to use the serger.


*Just to be clear- a serger is not required for this pattern, it helps, but not required.

Saturday, September 17, 2011

Monday, December 15, 2008

Discover this...

On the Discover web page:

Discover Card: Brighter. See how you can spend smarter with Discover Card

I know the #1 way!!!!!!!!!!!!!!!!!!!!!!!

Get a card in someone else's name and go nuts! All of the fun and none of the responsibility...Discover can make this dream a reality for some of your skanky neighbors too!!!

I ruined it for my neighbors...the ready to use card was delivered to the person (ME) and not the street address(SKANK THIEF).

I called Discover...only to "Discover" that they should not be allowed to use the word "Brighter" anywhere on their web page.

To prove that I was the real slim shady and not the fake slim skanky I had to drive 20 minutes to the nearest large "department" store with a customer service department. In our case that would be a Lowes....after 30 minutes we finally convinced the geniuses at Discover that I was the one and only Reevesfarm.

Once my ID was confirmed the tenor of the conversation went from hostile to apathetic. I wanted information about who had done this and they didn't give a rip. Between repeatedly saying "I don't know" and stifling yawns the fraud dept. person suggested that I file a police report. It was a Sunday so I had the pleasure of doing so at the county Jail...fun.

Later that same day I called Discover's fraud department to see if I could garner any more information about the original application:

Me: So how was the did they apply for this card?

Discover: Uhhhh...it says here...Telemarketing...

Me: Well what does that mean?

Discover: Uhhhh...by phone I think.

Me: Uh, yeah...but did you call them or did they call you????

Discover: Uhhh...it doesn't say.

Me: Was that call at least recorded?

Discover: no

Me: How did you approve a $5000 credit card when the birth date, address, and phone number did not match the name and SSN?

Discover:...............

Me: No signature, no recording of the call, nothing and you gave them a $5000 card in my frickin name!

Discover:............

Me: Can you give me ANY information that was collected in the application that might be helpful?

Discover: No

At some point I talked to another Fraud Dept. person, she told me that if Discover does not lose money that they do nothing. After providing me with NO additional information she did say that she would be happy to talk to the local police Investigator handling my case. I got her extension so that the investigator could reach her directly...he left a message and she did not return his call...or had not a couple of days later. Thanks so much.

When the investigator told me that he could not get the people at Discover to return his calls I tried again. The investigator was finally able to speak to someone...only to find out that Discover could not even tell him if the caller/applicant was male or female.

The geniuses that applied used their real address and phone number...but there are 4 adults that have access to that phone...when Discover can not even narrow the applicant down to male or female it makes my chance of successful prosecution slim.

There is always going to be that scumbag who steals from hardworking people...but having a company like Discover behave in such a reckless and callous way is mind boggling. I should be able to file criminal charges against you for abetting the bad guys.